Unlocking the Secret to Homemade Baklava: A Journey to Divine Sweetness
For many, the mere mention of baklava conjures images of delicate, honey-drenched pastry, a dessert so intricate it seems reserved for the hands of master confectioners. Perhaps you’ve even dismissed the idea of making it yourself, assuming it’s a culinary "king's discipline" – a task too daunting for the home kitchen. Well, prepare to have your preconceptions delightfully shattered! We're here to reveal that crafting your own unbelievably delicious baklava is not only achievable but also surprisingly simple, especially when you embrace a few clever shortcuts. Get ready to experience the profound satisfaction of pulling a tray of golden, fragrant baklava from your oven, knowing you’ve created something truly divine. If you've been searching for an authentic
Baklava Rezept that doesn't demand professional pastry skills, you've found it.
What Exactly is Baklava? A Timeless Sweet with Rich Roots
Before we dive into the creation process, let's appreciate the masterpiece we're about to make. Baklava is a quintessential sweet pastry with a rich history spanning centuries and cultures. Originating in the Ottoman Empire, it has become an iconic dessert across the Levant, the Arabian Peninsula, North Africa, and the Balkans. At its heart, baklava is a symphony of textures and flavors: myriad layers of whisper-thin, buttered filo pastry, a generous, aromatic nut filling, all drenched in a sweet, fragrant sugar syrup.
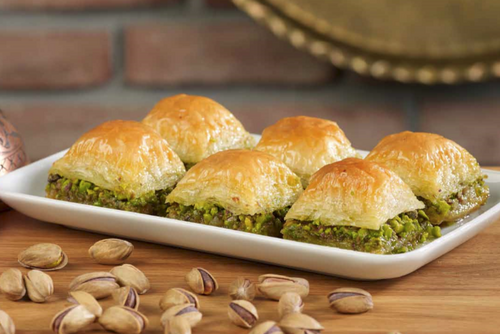
While the core concept remains consistent, baklava boasts an incredible diversity. Different regions proudly showcase their unique interpretations. For instance, in Turkey, baklava often features a vibrant pistachio filling, a true feast for the eyes and palate. In contrast, the Levant region, including countries like Lebanon, frequently prefers the robust, earthy flavor of walnuts. Our chosen
Original Baklava Recipe: Walnut or Pistachio Filling? Decide! can easily be adapted to your preference, allowing you to tailor your baklava journey. This delightful pastry isn't just a dessert; it's a celebration of tradition, craftsmanship, and pure indulgence.
Dispelling the Myth: Baklava is Easier Than You Think
The biggest hurdle for most aspiring baklava bakers isn't skill, but perception. The idea of working with delicate filo dough, layering it perfectly, and achieving that signature crispness can feel overwhelming. However, the secret weapon that transforms baklava from a daunting challenge into a joyful endeavor is remarkably simple: **store-bought filo pastry**. Gone are the days of laboriously making your own paper-thin dough from scratch. With readily available filo sheets, half the battle is already won.
My own first foray into baklava-making left me genuinely astonished by its simplicity. Following this straightforward approach, you can have truly *göttlich schmeckende Baklava* (divine-tasting baklava) on your table in under an hour of active preparation time. Forget what you thought you knew about this majestic sweet; with a little guidance, you’ll discover that homemade baklava is not just possible, but surprisingly accessible and immensely rewarding.
One significant advantage of making your baklava at home is the ability to control the sweetness. Often, store-bought versions can be overwhelmingly sugary. By carefully adjusting the sugar in your filling and syrup, you can create a more balanced flavor profile. This allows the exquisite taste of the nuts and butter to shine through, resulting in a less cloying, more nuanced dessert. The beauty of a homemade
Perfect Baklava: Make it Less Sweet, Crispy, and Customizable lies in this personalized touch.
Crafting Your Own Divine Baklava: The Step-by-Step Guide
This comprehensive Baklava Rezept will guide you through each stage, ensuring your success. We'll focus on a classic walnut filling, but remember, the world of baklava is your oyster when it comes to nut choices!
1. Prepare Your Nuts for the Perfect Crunch
The heart of your baklava lies in its filling. For this recipe, we're using walnuts, celebrated for their rich, slightly earthy flavor that pairs beautifully with the sweet syrup.
* **Texture is Key:** The goal is a combination of finely ground nuts and some small, textural pieces. Avoid making a paste. You want enough fine nut dust to meld with the butter and create a cohesive layer, but enough coarse chunks to provide an appealing bite and aroma.
* **Method:** You can achieve this by finely chopping the walnuts with a sharp knife, which gives you excellent control over the consistency. Alternatively, a food processor can do the job quickly; just be careful not to over-process. Pulse in short bursts, checking frequently, until you have a mix of coarse and fine pieces. Many find that lightly toasting the nuts beforehand enhances their flavor, bringing out their inherent oils and aroma.
2. Assembling the Layers: The Filo and Butter Dance
This is where the magic happens, turning simple ingredients into a masterpiece.
* **Prep Your Filo:** Thaw your filo pastry according to package directions, usually in the refrigerator overnight, then bring it to room temperature before using. This prevents it from cracking. Keep unused sheets covered with a damp cloth to prevent them from drying out, as filo is incredibly delicate.
* **Melt the Butter:** You'll need a generous amount of unsalted butter, melted. Clarified butter (ghee) is often preferred for baklava as it has a higher smoke point and pure flavor, but regular melted butter works perfectly well.
* **Layering Technique:**
1. Brush the bottom of your baking dish (a rectangular ovenproof dish works best) with melted butter.
2. Take one sheet of filo pastry. Lay it flat.
3. Brush the entire surface generously with melted butter. Don't be shy; the butter is what gives baklava its signature crispness and richness.
4. Sprinkle a layer of your prepared walnut filling evenly over the buttered filo.
5. Carefully roll the filo sheet tightly from one of the long sides, creating a log-like shape. Try to keep it as snug as possible to ensure many crisp layers.
6. Using a very sharp knife, cut the rolled filo log into 4-5 pieces. The sharpness of the knife is crucial to prevent tearing.
7. Arrange these pieces snugly in your buttered baking dish.
8. Repeat this process with the remaining filo sheets and nut filling until your baking dish is full, or you run out of ingredients.
9. Once all the rolls are in the dish, brush the tops with any remaining melted butter. This ensures a beautiful golden-brown finish and additional crispiness.
3. Baking to Golden Perfection
* **Preheat:** Preheat your oven to 180°C (350°F) using the convection setting (Umluft).
* **Bake Time:** Bake for approximately 25 to 30 minutes, or until the baklava turns a deep golden brown and the layers are visibly crisp. Keep an eye on it, as oven temperatures can vary.
4. The All-Important Syrup: The Soul of Baklava
While your baklava bakes, prepare the vital sugar syrup. This syrup not only sweetens the pastry but also imparts its characteristic moistness and flavor.
* **Ingredients:** Combine sugar and water in a saucepan. The ratio can be adjusted slightly based on your sweetness preference, but a common starting point is roughly equal parts sugar and water by volume.
* **Preparation:** Heat the mixture, stirring constantly, until the sugar completely dissolves. Bring it to a gentle boil and let it simmer for several minutes. This allows the syrup to thicken slightly.
* **The Lemon Touch:** Just before taking the syrup off the heat, add a generous squeeze of fresh lemon juice. The lemon is crucial for two reasons: it brightens the flavor, cutting through the sweetness, and it helps prevent the syrup from crystallizing, keeping it smooth and pourable.
* **Application:** As soon as your baklava emerges from the oven, *while it is still hot*, immediately and evenly pour the freshly prepared hot syrup over the entire surface. You'll hear a satisfying sizzle as the pastry greedily absorbs the sweet liquid. This thermal shock is part of what gives baklava its unique texture – soft and moist within, yet crisp on top.
5. The Waiting Game and Finishing Touches
This step is arguably the most crucial for achieving that authentic baklava flavor.
* **Let it Soak:** Allow the baklava to sit and soak in the syrup for a considerable amount of time – ideally several hours, or even overnight, at room temperature. This prolonged rest allows the syrup to fully penetrate every layer, infusing the pastry with flavor and achieving the perfect moist-yet-crisp texture. Rushing this step will result in a less flavorful and drier baklava.
* **Decorate:** Once fully absorbed, decorate your baklava. Chopped pistachios provide a beautiful color contrast and an extra layer of nutty flavor, making your homemade baklava not just delicious, but also visually stunning.
Customizing Your Baklava: Beyond the Basics
The beauty of a homemade baklava is its versatility.
* **Nut Varieties:** While walnuts are classic, don't hesitate to experiment. Pistachios offer a more delicate, vibrant flavor. Almonds provide a slightly sweeter, milder note. You can also create a blend of different nuts to discover your unique favorite.
* **Sweetness Levels:** As mentioned, you have full control. If you prefer your baklava less sweet than traditional versions, reduce the sugar content in the nut filling (the reference context even completely omitted sugar in the filling for a less sweet result) and consider slightly reducing the sugar in the syrup, or increasing the lemon juice for a tangier balance.
* **Spices:** A pinch of cinnamon or ground cloves mixed with your nuts can add an exotic depth of flavor that elevates your baklava even further.
Tips for Baklava Perfection
* **Quality Ingredients:** Use good quality butter and fresh nuts. These make a tangible difference in the final taste.
* **Sharp Knife:** A very sharp knife is non-negotiable for clean cuts of the filo rolls and for portioning the finished baklava.
* **Patience with Soaking:** Don't skip or shorten the soaking time. It's vital for flavor and texture.
* **Storage:** Store baklava at room temperature in an airtight container. It will remain fresh and delicious for several days, often tasting even better the day after it's made, once the flavors have fully melded.
Why Homemade Baklava Reigns Supreme
There's an undeniable joy and pride that comes with making baklava from scratch. You control the quality of the ingredients, the precise level of sweetness, and the freshness that simply cannot be matched by pre-packaged alternatives. Each bite of your homemade creation will be a testament to your effort and a celebration of truly authentic flavors. It’s an experience that goes beyond mere consumption – it’s a taste of tradition, crafted with love.
Conclusion
Embarking on the journey of making homemade baklava, once considered a formidable challenge, reveals itself to be a surprisingly simple and deeply rewarding culinary adventure. Armed with store-bought filo pastry and our detailed
Baklava Rezept, you're well-equipped to create a dessert that is not only "divine-tasting" but also customized to your preference, allowing you to enjoy more than just one piece! So, gather your ingredients, follow these steps, and prepare to impress yourself and your loved ones with a tray of golden, crispy, and utterly delicious baklava. Your taste buds will thank you!